Installing ANTLR on Windows

As the Mac is still unavailable and in the tradition of making my Windows PC a good back-up work machine, I decided to instal the ANTLR parser generator . This took place in several steps.

Installation of ANTLR itself

The download page of the ANTLR site has the information required to set up ANTLR, though it’s not as clearly laid out as one might like, in terms of page structure.

Here’s what we’re told in summary: ‘All users should download the ANTLR tool itself and then choose a runtime target below, unless you are using Java which is built into the tool jar.’ Clicking the link downloads the file antlr-4.10.1-complete.jar.

Of the available run-time targets, only Python was really viable for me. So, as per instructions, I ran a Powershell as administrator and issued the command pip install antlr4-python3-runtime. While this worked fine, I was also advised that pip was out of date and encouraged to update it, which I did. The output follows below.

Python 3 run-time installation output

pip install antlr4-python3-runtime
Collecting antlr4-python3-runtime
Downloading antlr4-python3-runtime-4.10.tar.gz (116 kB)
|████████████████████████████████| 116 kB 1.1 MB/s
Using legacy 'setup.py install' for antlr4-python3-runtime, since package 'wheel' is not installed.
Installing collected packages: antlr4-python3-runtime
Running setup.py install for antlr4-python3-runtime … done
Successfully installed antlr4-python3-runtime-4.10
WARNING: You are using pip version 21.1.1; however, version 22.2.2 is available.
You should consider upgrading via the 'c:\program files\python39\python.exe -m pip install --upgrade pip' command.

Pip ugrade output

This got a little messy, as you can see, but it got done.

c:\program files\python39\python.exe -m pip install --upgrade pip
c:\program : The term 'c:\program' is not recognized as the name of a cmdlet, function, script file, or operable
program. Check the spelling of the name, or if a path was included, verify that the path is correct and try again.
At line:1 char:1
+ c:\program files\python39\python.exe -m pip install --upgrade pip
+ ~~~~~~~~~~
    + CategoryInfo          : ObjectNotFound: (c:\program:String) [], CommandNotFoundException
    + FullyQualifiedErrorId : CommandNotFoundException
PS C:\WINDOWS\system32> pip install --upgrade pip
Requirement already satisfied: pip in c:\program files\python39\lib\site-packages (21.1.1)
Collecting pip
Downloading pip-22.2.2-py3-none-any.whl (2.0 MB)
|████████████████████████████████| 2.0 MB 1.3 MB/s
Installing collected packages: pip
Attempting uninstall: pip
Found existing installation: pip 21.1.1
Uninstalling pip-21.1.1:
Successfully uninstalled pip-21.1.1
ERROR: Could not install packages due to an OSError: [WinError 5] Access is denied: 'C:\Users\k\AppData\Local\Temp\pip-uninstall-pnbcktle\pip.exe'
Consider using the --user option or check the permissions.
PS C:\WINDOWS\system32> cd \
PS C:> cd '.\Program Files\'
PS C:\Program Files> cd .\Python39\
PS C:\Program Files\Python39> python.exe -m pip install --upgrade pip
Requirement already satisfied: pip in c:\program files\python39\lib\site-packages (22.2.2)

How to use ANTLR?

The download page suggested visiting the ‘read-me’ on github, which I did, following which I opened the ‘Getting started’ page . In the ‘Windows’ section, things got a little more explicit; here was the workflow:

  • it was suggested to place the original ANTLR download in a suitable directory such as 
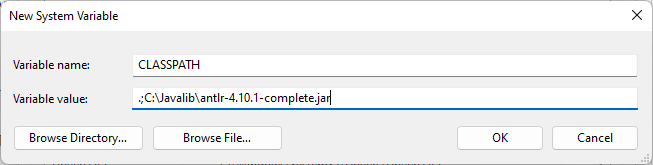
C:\Javalib. Ok, all things being equal, I created that directory and moved the file over
  • I added antlr-4.10.1-complete.jar to the CLASSPATH environment variable, which I created as a system-wide
    Displays the values for the CLASSPATH variable
  • create antlr4.bat in some directory accessed by the PATH variable (I used a newly created C:\Bat, which I added to the system path)
    java org.antlr.v4.Tool %*
  • create grun.bat in a similar way
    @ECHO OFF
    SET TEST_CURRENT_DIR=%CLASSPATH:.;=%
    if "%TEST_CURRENT_DIR%" == "%CLASSPATH%" ( SET CLASSPATH=.;%CLASSPATH% )
    @ECHO ON

    java org.antlr.v4.gui.TestRig %*

Testing

Installation test

As suggested, I ran the command java -jar /usr/local/lib/antlr-4.10.1-complete.jar from the command line to check the installation. Apparently, my Java version (only just installed, so latest) was too old??

java org.antlr.v4.Tool
Error: A JNI error has occurred, please check your installation and try again
Exception in thread "main" java.lang.UnsupportedClassVersionError: org/antlr/v4/Tool has been compiled by a more recent version of the Java Runtime (class file version 55.0), this version of the Java Runtime only recognizes class file versions up to 52.0
at java.lang.ClassLoader.defineClass1(Native Method)
at java.lang.ClassLoader.defineClass(Unknown Source)
at java.security.SecureClassLoader.defineClass(Unknown Source)
at java.net.URLClassLoader.defineClass(Unknown Source)
at java.net.URLClassLoader.access$100(Unknown Source)
at java.net.URLClassLoader$1.run(Unknown Source)
at java.security.AccessController.doPrivileged(Native Method)
at java.net.URLClassLoader.findClass(Unknown Source)
at java.lang.ClassLoader.loadClass(Unknown Source)
at sun.misc.Launcher$AppClassLoader.loadClass(Unknown Source)
at java.lang.ClassLoader.loadClass(Unknown Source)
at sun.launcher.LauncherHelper.checkAndLoadMain(Unknown Source)

I put a query out on StackOverflow , and discovered that a different version of Java altogether was required . There are zip and msi versions of the installer; it turns out that the zip requires one to manually move the run-time to some location and set the path accordingly; and I also had to run the Java uninstal tool to get rid of the unwanted version .

This solved the problem!

java org.antlr.v4.Tool
ANTLR Parser Generator  Version 4.10.1
 -o ___              specify output directory where all output is generated
 -lib ___            specify location of grammars, tokens files
 -atn                generate rule augmented transition network diagrams
 -encoding ___       specify grammar file encoding; e.g., euc-jp
 -message-format ___ specify output style for messages in antlr, gnu, vs2005
 -long-messages      show exception details when available for errors and warnings
 -listener           generate parse tree listener (default)
 -no-listener        don't generate parse tree listener
 -visitor            generate parse tree visitor
 -no-visitor         don't generate parse tree visitor (default)
 -package ___        specify a package/namespace for the generated code
 -depend             generate file dependencies
 -D<option>=value    set/override a grammar-level option
 -Werror             treat warnings as errors
 -XdbgST             launch StringTemplate visualizer on generated code
 -XdbgSTWait         wait for STViz to close before continuing
 -Xforce-atn         use the ATN simulator for all predictions
 -Xlog               dump lots of logging info to antlr-timestamp.log
 -Xexact-output-dir  all output goes into -o dir regardless of paths/package

Practical test

Next, I set up the little test programme as suggested and saved it (hello.g4) in a temporary directory.

// Define a grammar called Hello
grammar Hello;
r  : 'hello' ID ;         // match keyword hello followed by an identifier
ID : [a-z]+ ;             // match lower-case identifiers
WS : [ \t\r\n]+ -> skip ; // skip spaces, tabs, newlines

I navigated to the directory using Powershell and entered the following:

$ antlr4 Hello.g4
$ javac Hello*.java
hello parrt
^Z

This got me the expected output:

(r hello parrt)

Next I tried the GUI option.

$ grun Hello r -gui
hello parrt
^Z

This got me a nice graphical representation of the same information:
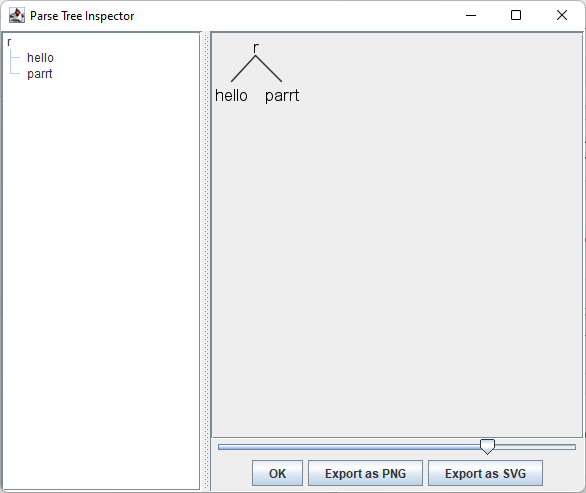
Display of the parse tree in graphical form
A graphical ANTLR parse tree

All systems go!

References

{7910634:Q4GPTAJU};{7910634:BV52FBUR};{7910634:W58MPLZL};{7910634:YTYF2GH6};{7910634:SX7JPIIF} chicago-annotated-bibliography creator asc 0 81

Adding the ‘python-docx’ package to Anaconda

Today I continued working on converting my syllabus builder to run on Mac and PC from a NAS drive. The first thing I discovered was that the python-docx package was not installed. I ran into two problems while trying to remedy this.

Package channel location

First, I discovered that this package was not housed in the default ‘channels’ of conda install <package name>, and was advised to just search the Anaconda site for the package name. Doing this, I learned that the conda-forge channel had a recent version of this package, and when I clicked on the link, discovered that it could be installed with conda install -c conda-forge python-docx. Great![1]Somehow, I found this information a different way earlier, and used the longer form -channel as you’ll see from the output shown below.

But then I discovered that the conda command was only accessible when I ran the Powershell from within Anaconda … but that this didn’t give me the necessary write permissions. A Google search found the solution, however .

Issuing the command where conda from within the Anaconda-run Powershell told me where to find what I needed, and so I updated the system environment variables accordingly (see the last three lines of the screenshot below).

Shows the environment variables required to locate the conda command
Environment variables associated with the conda command

Finally, I opened a new Powershell window and ran the python-docx installation. The output is shown below.

conda install --channel "conda-forge" python-docx
Collecting package metadata (current_repodata.json): done
Solving environment: done

## Package Plan ##

  environment location: C:\ProgramData\Anaconda3

  added / updated specs:
    - python-docx


The following NEW packages will be INSTALLED:

  python-docx        conda-forge/noarch::python-docx-0.8.11-pyhd8ed1ab_0
  python_abi         conda-forge/win-64::python_abi-3.8-2_cp38

The following packages will be UPDATED:

  conda              pkgs/main::conda-4.13.0-py38haa95532_0 --> conda-forge::conda-4.14.0-py38haa244fe_0


Proceed ([y]/n)? y

Preparing transaction: done
Verifying transaction: done
Executing transaction: done

References

{7910634:Y9C7KEJ5};{7910634:H8XFNASD} chicago-annotated-bibliography creator asc 0 75

Footnotes

Footnotes
1 Somehow, I found this information a different way earlier, and used the longer form -channel as you’ll see from the output shown below.

Setting up the PC for office work

My Mac is with Apple for a battery replacement, which is estimated to take up to ten (10!) days. In the meantime, this means having to do my office work on the Windows PC instead.

That meant three things for the moment:

  1. installation of the TeX typesetting system
  2. installation of Anaconda (or so I thought)
  3. adapting my Jupyter Notebook for course syllabus generation to work on both the PC and the Mac.

TeX

There are several options for installation of *TeX on Windows. In the past, I’ve tried MikTeX but found it kludgy, so I decided to go with TeX Live.

TeX Live

TeXLive installation is fairly straightforward :

  • download and run install-tl-windows.exe
    • Note: this results in a warning message;[1]‘Microsoft Defender SmartScreen prevented an unrecognised app from starting. Running this app might put your PC at risk.’; select ‘Run anyway’
    • by default, installation is single-user; for all users, run as administrator
    • at the time of writing, this required 76822 MB of space on C: drive
    • specify preferred default paper size[2]It is set to ‘A4’; in North America, change to ‘Letter’.
    • by default it will instal the TeXworks editor, which is likely what is wanted.[3]This is the Windows equivalent to the Mac-only TeXShop. It’s not as sophisticated but works well enough.
    • as a reference, the installation took over 3.5 hours on my Bell satellite internet system
  • no updates were required following installation.

TeXworks additional configuration

The TeXworks editor is installed by default with a TeX Live installation unless one tells it otherwise.

Out of the box, it is configured for all the basic compilation choices; the make script is not included by default, but I need it with my complex file set-ups.

I found a question regarding this on StackExchange . The salient configuration for the make utility is as follows:

The configuration details for a xelatexmk run
Configuration details for a XeLaTeX make run in TeXworks

Anaconda

Anaconda is a popular Python-based data science tool. I first came across it when I took a few free edx.org Python courses. Now I use its Jupiter Notebook module to create my class syllabi. Eventually, I may do something more sophisticated with ANTLR 🙂

The installer download is prominently placed on the Anaconda home page.

  • at the time of writing, the 64-bit graphical installer was 594 MB
  • as a precaution, I right-clicked and ran as administrator, though it’s not clear this was necessary from the dialogue
  • disc space requirement was given as 5.3 GB
  • apparently I had already installed Anaconda in the past and had forgotten, so that was the end of that!

So, instead, I looked into how to upgrade my installation:

  • open Anaconda (Navigator)
  • click on ‘Documentation’ in the lower left corner
  • choose ‘Updating Navigator’
    • apparently running Anaconda results in an automatic check for updates, but the procedure is given to do it manually if desired
    • so, no need to do this, either
  • try to update installed python packages
    • from within Navigator, open the PowerShell Prompt
    • type conda update
    • this informed me that I had to supply the name(s) of package(s) I wanted to update, but also told me I could update Anaconda using
      conda update --prefix C:\ProgramData\Anaconda3 anaconda
    • I discovered that for this to work, I needed write permissions, i.e., Anaconda had to be run as administrator, so did that
    • the output from the successful run is given below.
Collecting package metadata (current_repodata.json): done
Solving environment: done

## Package Plan ##

  environment location: C:\ProgramData\Anaconda3

  added / updated specs:
    - anaconda


The following NEW packages will be INSTALLED:

  pathlib            pkgs/main/noarch::pathlib-1.0.1-pyhd3eb1b0_1

The following packages will be UPDATED:

  conda                               4.10.3-py38haa95532_0 --> 4.13.0-py38haa95532_0
  conda-content-tru~ pkgs/main/noarch::conda-content-trust~ --> pkgs/main/win-64::conda-content-trust-0.1.3-py38haa95532_0
  conda-package-han~                   1.7.3-py38h8cc25b3_1 --> 1.8.1-py38h8cc25b3_0
  conda-repo-cli     pkgs/main/noarch::conda-repo-cli-1.0.~ --> pkgs/main/win-64::conda-repo-cli-1.0.5-py38haa95532_0

The following packages will be DOWNGRADED:

  xmltodict                                     0.12.0-py_0 --> 0.12.0-pyhd3eb1b0_0


Proceed ([y]/n)? y

Preparing transaction: done
Verifying transaction: done
Executing transaction: done

By the way, opening Jupyter Notebook the usual way within Anaconda will always only show files on C: drive. If one wants it to look elsewhere, one must

  • open Powershell Prompt within Anaconda Navigator
  • issue the command, e.g., jupyter notebook --notebook-dir=Y:/ (Y: is where I keep things shared by the Mac and PC).

The Jupyter Notebook syllabus builder

I generate my MS Word syllabi programmatically. This saves a great deal of time, especially when teaching the course beyond the first time, as this typically simply means updating some dates, and also ensures that dates appearing in various places are not inconsistent.

This currently relies on several Excel spreadsheets as data sources, which are read by the notebook and used to produce the syllabus.

Thus far, I have always run this on the Mac. As I now wish to be able to do it from PC as well, I’ve started adapting the Python code in the notebook to find its input on my NAS drive as well as send the output there.

I didn’t quite finish the task today, but made good headway!

References

{7910634:XNMJUECZ};{7910634:JDX8DF62};{7910634:Y9C7KEJ5};{7910634:Q4GPTAJU} chicago-annotated-bibliography creator asc 0 62

Footnotes

Footnotes
1 ‘Microsoft Defender SmartScreen prevented an unrecognised app from starting. Running this app might put your PC at risk.’
2 It is set to ‘A4’; in North America, change to ‘Letter’.
3 This is the Windows equivalent to the Mac-only TeXShop. It’s not as sophisticated but works well enough.

Windows PowerShell update

The other day, I opened the Windows shell to check my Python installation, and I was greeted with this message:

Install the latest PowerShell for new features and improvements! https://aka.ms/PSWindows

So I decided to look into it.

In the end, it’s not hard to do . Open the shell, then issue

winget install --id Microsoft.Powershell.Preview --source winget

This downloads the latest version and runs the installer. Output is similar to the following:

Found PowerShell [Microsoft.PowerShell] Version 7.2.6.0
This application is licensed to you by its owner.
Microsoft is not responsible for, nor does it grant any licenses to, third-party packages.
Downloading https://github.com/PowerShell/PowerShell/releases/download/v7.2.6/PowerShell-7.2.6-win-x64.msi
  ██████████████████████████████   102 MB /  102 MB
Successfully verified installer hash
Starting package install...
Successfully installed

References

{7910634:P3DVXYAX} chicago-annotated-bibliography default asc 0 57

Updated GIMP

I updated GIMP to version 2.10.30 on my Dell system today. I had used GIMP and a pop-up informed me that there was an upgrade (from .28).

Then I decided to check the Mac; opened GIMP and nothing happened. Checked on-line, and yes indeed, there was an update for it as well. I wonder why that didn’t feature a pop-up?

Accessing an Airport Extreme backup drive from Windows 11

I recently moved my RAID USB drive from a direct connection to my MacBook Pro to the network level in order to make it accessible to all my devices.

Despite evidence to the contrary, I was not able to connect the drive directly to my network hub, so I set up my old Airport Extreme as a bridge between the two. This worked just fine, and the MacBook now backs up to the RAID drive just fine.

I discovered, however, that my Dell Desktop, which is on the same network, fails to recognize it; in fact, I eventually realized that it wasn’t seeing the Airport Extreme, even. After some on-line searching, I concluded that I should instal the Windows version of the Airport Utility, which immediately detected the Airport Extreme and asked for the password!

Alas, this was the end of the line, despite the fact that I had enabled the SMB 1 protocol, which, I understand, is disabled in Windows by default due to security vulnerabilities but required by the Airport Extreme. It refused to accept the password, and all attempts to configure manually from the Windows end failed with an error.

While it may well be possible to remedy this situation, the problem is temporary, as I have a WD RAID drive on order which is due to arrive later this month. Let’s hope that’s the end of the complications!

Initial set-up

Today, I decided that rather than have all kinds of diverse things on my personal website, I should create dedicated sites for each of my interests, and keep it for biographical and personal interest information.

This site will house my various (professional and personal) endeavours in the realm of computer science.

I began with a first post and then created a stub About me page and set up the basic menu structure. I’ll continue as I have time and leisure.

Set Mac Finder view globally

From time to time, such as when I’ve upgraded the operating system on my Mac, I’ve found that the Finder view resets to icon view. In my line of work (higher education), I prefer list view, since this lets me inspect various file attributes at a glance as well as sort on them easily. And each time, I am frustrated by the difficulty in figuring out how to set everything back the way it was, globally. (It’s amazing how often a search on how to change “all folders” results in solutions for how to change a given folder only!

Here’s one way to do it:

  1. Open Finder and select the hard drive.
  2. Set the view type of this folder to list:
    Finder window for the hard drive with focus on the list view selection
  3. Issue command-J and tick the top two boxes, labelled Always open in list view and Browse in list view:[1]The first of these ensures that the current folder will be opened in list view (actually, in whatever view was selected when the command-J was issued), while the second cascades this to all … Continue reading
    Window showing view options when command-J has been issued
  4. Click Use as Defaults at the bottom of the window.
  5. Open a Terminal window and issue the following command (root password will be required) to remove any individual folder overrides which have been set in the past:
sudo find / -name ".DS_Store"  -exec rm {} \;

Full discussion at

Image credits and references

{5462604:IKWYUZ6R};{5462604:HZ8GX4HD};{5462604:BR5VLUMI} chicago-annotated-bibliography creator asc 0 4

Footnotes

Footnotes
1 The first of these ensures that the current folder will be opened in list view (actually, in whatever view was selected when the command-J was issued), while the second cascades this to all sub-folders.