My Mac is with Apple for a battery replacement, which is estimated to take up to ten (10!) days. In the meantime, this means having to do my office work on the Windows PC instead.
That meant three things for the moment:
- installation of the TeX typesetting system
- installation of Anaconda (or so I thought)
- adapting my Jupyter Notebook for course syllabus generation to work on both the PC and the Mac.
TeX
There are several options for installation of *TeX on Windows. In the past, I’ve tried MikTeX but found it kludgy, so I decided to go with TeX Live.
TeX Live
TeXLive installation is fairly straightforward :
- download and run install-tl-windows.exe
- Note: this results in a warning message;[1]‘Microsoft Defender SmartScreen prevented an unrecognised app from starting. Running this app might put your PC at risk.’; select ‘Run anyway’
- by default, installation is single-user; for all users, run as administrator
- at the time of writing, this required 76822 MB of space on C: drive
- specify preferred default paper size[2]It is set to ‘A4’; in North America, change to ‘Letter’.
- by default it will instal the TeXworks editor, which is likely what is wanted.[3]This is the Windows equivalent to the Mac-only TeXShop. It’s not as sophisticated but works well enough.
- as a reference, the installation took over 3.5 hours on my Bell satellite internet system
- no updates were required following installation.
TeXworks additional configuration
The TeXworks editor is installed by default with a TeX Live installation unless one tells it otherwise.
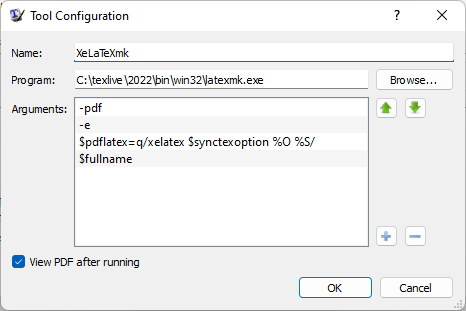
Out of the box, it is configured for all the basic compilation choices; the make script is not included by default, but I need it with my complex file set-ups.
I found a question regarding this on StackExchange . The salient configuration for the make utility is as follows:
Anaconda
Anaconda is a popular Python-based data science tool. I first came across it when I took a few free edx.org Python courses. Now I use its Jupiter Notebook module to create my class syllabi. Eventually, I may do something more sophisticated with ANTLR 🙂
The installer download is prominently placed on the Anaconda home page.
- at the time of writing, the 64-bit graphical installer was 594 MB
- as a precaution, I right-clicked and ran as administrator, though it’s not clear this was necessary from the dialogue
- disc space requirement was given as 5.3 GB
- apparently I had already installed Anaconda in the past and had forgotten, so that was the end of that!
So, instead, I looked into how to upgrade my installation:
- open Anaconda (Navigator)
- click on ‘Documentation’ in the lower left corner
- choose ‘Updating Navigator’
- apparently running Anaconda results in an automatic check for updates, but the procedure is given to do it manually if desired
- so, no need to do this, either
- try to update installed python packages
- from within Navigator, open the PowerShell Prompt
- type
conda update - this informed me that I had to supply the name(s) of package(s) I wanted to update, but also told me I could update Anaconda using
conda update --prefix C:\ProgramData\Anaconda3 anaconda - I discovered that for this to work, I needed write permissions, i.e., Anaconda had to be run as administrator, so did that
- the output from the successful run is given below.
Collecting package metadata (current_repodata.json): done
Solving environment: done

## Package Plan ##

  environment location: C:\ProgramData\Anaconda3

  added / updated specs:
    - anaconda


The following NEW packages will be INSTALLED:

  pathlib            pkgs/main/noarch::pathlib-1.0.1-pyhd3eb1b0_1

The following packages will be UPDATED:

  conda                               4.10.3-py38haa95532_0 --> 4.13.0-py38haa95532_0
  conda-content-tru~ pkgs/main/noarch::conda-content-trust~ --> pkgs/main/win-64::conda-content-trust-0.1.3-py38haa95532_0
  conda-package-han~                   1.7.3-py38h8cc25b3_1 --> 1.8.1-py38h8cc25b3_0
  conda-repo-cli     pkgs/main/noarch::conda-repo-cli-1.0.~ --> pkgs/main/win-64::conda-repo-cli-1.0.5-py38haa95532_0

The following packages will be DOWNGRADED:

  xmltodict                                     0.12.0-py_0 --> 0.12.0-pyhd3eb1b0_0


Proceed ([y]/n)? y

Preparing transaction: done
Verifying transaction: done
Executing transaction: done
By the way, opening Jupyter Notebook the usual way within Anaconda will always only show files on C: drive. If one wants it to look elsewhere, one must
- open Powershell Prompt within Anaconda Navigator
- issue the command, e.g.,
jupyter notebook --notebook-dir=Y:/(Y: is where I keep things shared by the Mac and PC).
The Jupyter Notebook syllabus builder
I generate my MS Word syllabi programmatically. This saves a great deal of time, especially when teaching the course beyond the first time, as this typically simply means updating some dates, and also ensures that dates appearing in various places are not inconsistent.
This currently relies on several Excel spreadsheets as data sources, which are read by the notebook and used to produce the syllabus.
Thus far, I have always run this on the Mac. As I now wish to be able to do it from PC as well, I’ve started adapting the Python code in the notebook to find its input on my NAS drive as well as send the output there.
I didn’t quite finish the task today, but made good headway!
References
Footnotes
| ↑1 | ‘Microsoft Defender SmartScreen prevented an unrecognised app from starting. Running this app might put your PC at risk.’ |
|---|---|
| ↑2 | It is set to ‘A4’; in North America, change to ‘Letter’. |
| ↑3 | This is the Windows equivalent to the Mac-only TeXShop. It’s not as sophisticated but works well enough. |